Link to the blog where I found this
There's always been a need to remove passwords from protected Microsoft Word documents when you need to make a change. My most common occurrence is with Human Resource (HR) forms. HR staff will create the MS Word document, password protect it, and then upload it to our company intranet. However, when I need to fill the form out, the only way to do so is to print the form, sign my name, scan the signed & printed form, and them email it back to them. What I would like to do, is to just paste a scan of my signature onto the form, save as a PDF, and them email them the PDF saving printing and scanning time and paper (which would then need to be shredded).
Here’s a trick that I learned a long time ago.
Make sure the MS Word document is password protected
- Open the document in MS Word
- Select the “Review” tab in MS Word
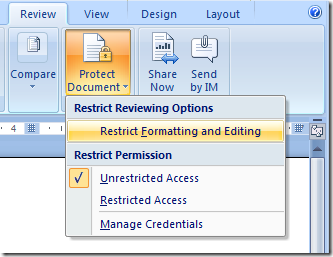
- Click and Hold the “Protect Document” button to reveal more choices
- Click “Restrict Formatting and Editing”
- You should see a “Stop Protection” button on the bottom of the opened panel
- Click the “Stop Protection” button
If it prompts you for a password, then let’s continue to remove the password.

Removing the Password from the MS Word document
Step 1. Convert document to RTF
- Click “Save As…” menu option, then choose “Other Formats”
- Select “Rich Text Format (*.rtf)” file type and provide a filename ending with .rtf
- Close the document and/or MS Word
Step 2. Remove password
- Open Notepad (or any text editor, I prefer Notepad2)
- Open the RTF file (from step 2) in the text editor
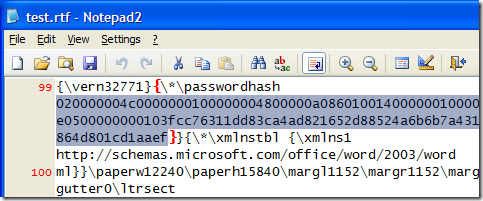
- Search for “passwordhash”. You should see text that looks something like this:
{\*\passwordhash ########} - Select the text after “passwordhash” until you get to the “}” (curly bracket). Make sure to not select the “}” or “{“ characters!
- Delete the selected text
- The text should look something like this now:
{\*\passwordhash} - Save the file and close your text editor

Step 3. Convert back to MS Word and Stop Protection
- Open the RTF file using MS Word
- Click “Save As…” menu option, then choose “Word Document (*.docx)”
- Select the “Review” tab in MS Word
- Click and Hold the “Protect Document” button to reveal more choices
- Click “Restrict Formatting and Editing”
- Click the “Stop Protection” button
All done! You should have an unprotected Microsoft Word document now.